The AD integration makes it possible to set up a single sign-on (SSO) function against a local Active Directory (AD) or other authentication servers with similar functionality.
Authentication against Azure AD is currently not yet available and will be added with a later release.
Single sign-on authentication can optionally be used for logging in as a user and as a user of the Self-Service Portal (SSP).
For secure technical integration, local settings must be made in the customer network and a provided authentication tool must be installed.
|
Note: The function described here is tested exclusively in connection with a local AD. The instructions and the authentication tool provided are also prepared for AD authentication only. Problems with other authentication systems are not supported if not explicitly described in this help. |
Description of the administration settings functions 
•Label of the login button: On the login page, a button for "Windows Login" is displayed after activating the function. The label of this button can be changed individually via this field if special labels exist in the company for such functions.
•AD-authentication: Activates the function in the system. Thus, the option is generally displayed on the login page. Important: the function must be activated additionally for each user and person. The activation takes up to one minute until it is usable.
•Use field UserPrincipalName for authentication: In standard, the AD field "SamAccountName" is used for authentication. Check this box, if the AD field "UserPrinicipleName" is used for authentication instead. Attention: If you have checked this field during the configuration of the AD integration in the ticket system, the UserPrincipalName must also be stored in the "Login Name" field for all persons/users. Please also adjust the import file accordingly.
•RedirectURL: The URL of the server address of the authentication tool must be stored here. The authentication request is made against this system. Replace the URL with "/auth" in the end. You can use http or https, depending on your configuration of the IIS.
Example:
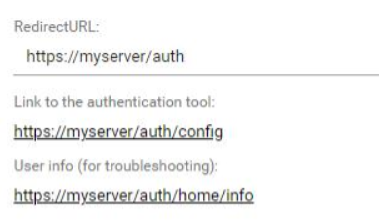
•Link to the authentication tool: This link is generated automatically after entering the redirect URL. The link directly opens the input dialog for the settings token. If the tool opens with this URL, it is set up correctly and the path is also entered correctly.
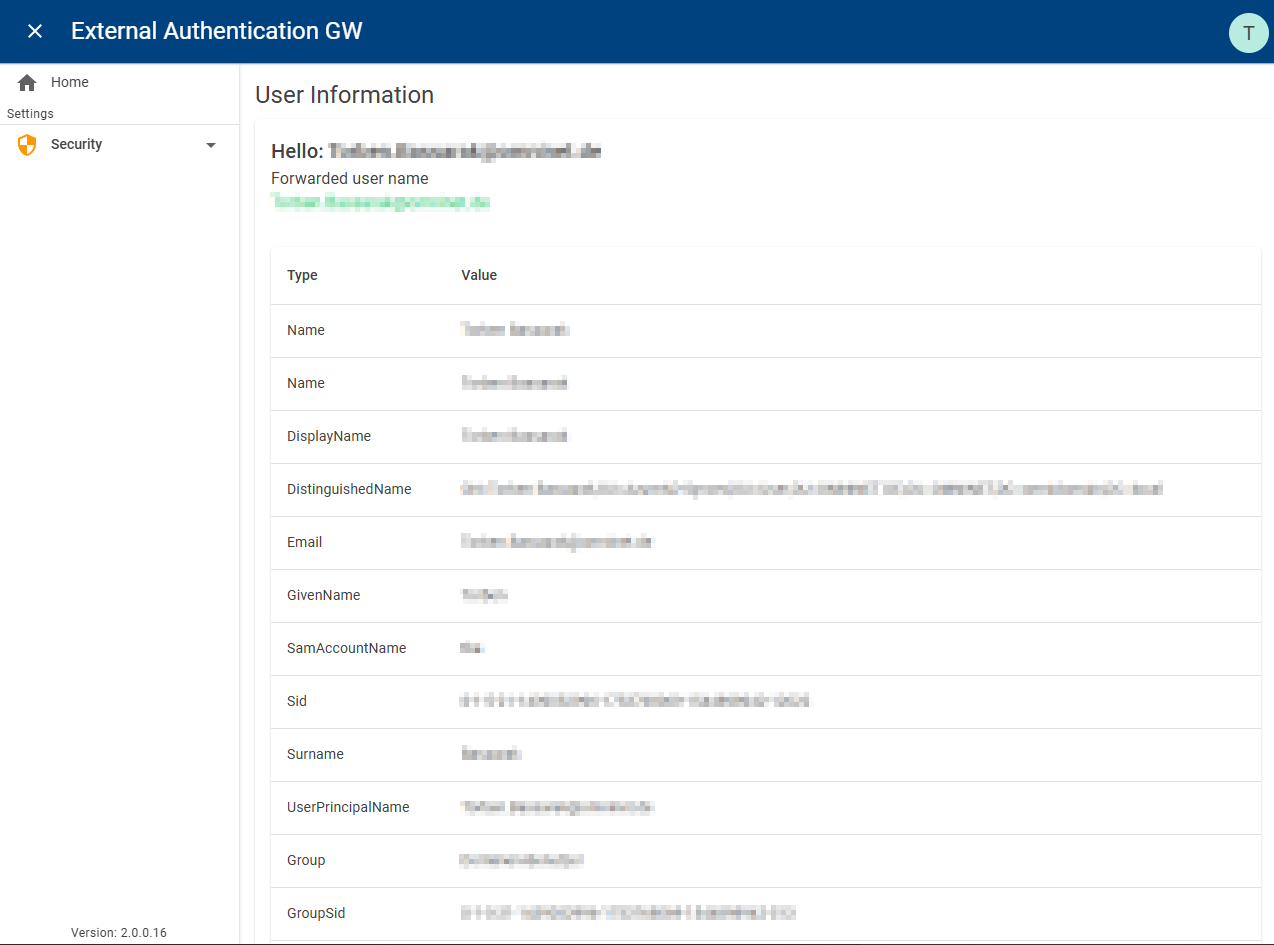
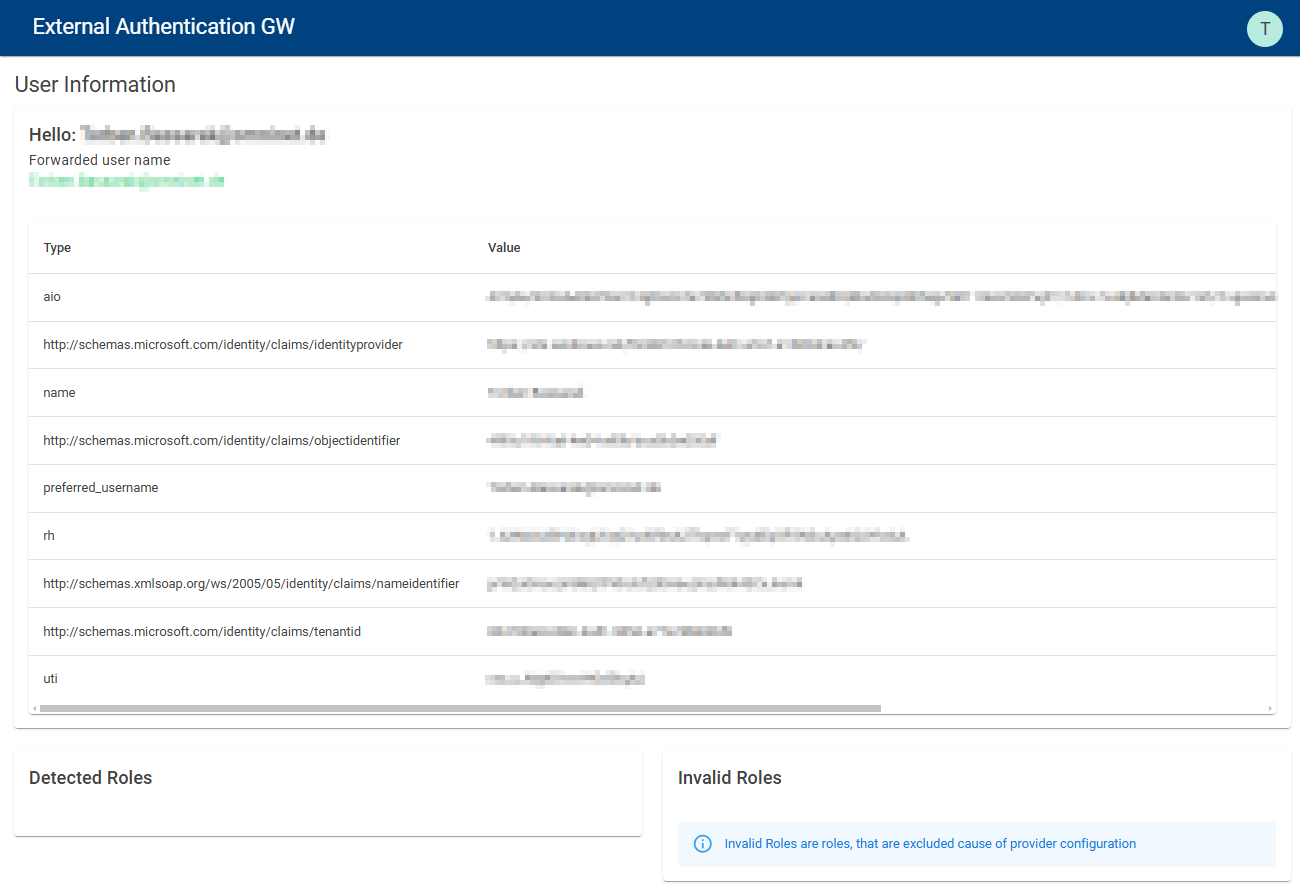
•User info (for troubleshooting): opens a link with a tool that shows all permissions of the current used windows user to the admin. This helps to understand the domain and permission context the current user is in while setting the SSO configuration. The "SamAccountName" or "User Principal Name" displayed in the User Info must match the login name on the person/user record in the system. Which of the two fields is used for authentication depends on the corresponding setting (see above).
Userinfo Local Active Directory
Userinfo Azure Active Directory
•Button "GENERATE SETTINGS TOKEN": This button generates the token, which automatically makes all settings in the authentication tool and uses a high security encryption standard (SHA 265). Please generate the token only after entering the correct redirect URL.
•Settings-Token: Once the token is generated, it can be copied and pasted into the input field in the local authentication tool (tool opens directly with the input field).
•Deactivate password login for SSP: Option that only the Windows authentication method is offered on the login screen for the SSP. This can avoid misunderstandings if no passwords are to be managed for the ticket system and users try to log in with the Windows user/password. Important note: If the AD integration is not technically available, there is no alternative way to log in to the SSP. The restriction only applies to normal users. Users with a real user account (ticket processors, admins etc.) always have the additional option "username/password" on the login screen to always have a fallback for logging in
|
Notes on the methods, protocols and security mechanisms used: The protocols / mechanisms used are http(s) (configurable by the customer based on IIS) and JSON Web Token (JWT).
Technical process of authentication: •After clicking the login button, the system redirects the user to the web server where the authentication tool is installed (redirect URL). •The IIS performs the authentication against the AD using the Windows authentication integrated there by default. •IIS then sets a variable which is accessed by the authentication tool •The authentication tool generates a JSON Web Token (JWT) signed with SHA256 using the credentials it receives. This token is then securely forwarded to our service using https. The JWT token contains the login name (no password!) of the user. •The login name is searched for in the ticketing system and - if available - used for the login. |
Installation of the authentication tool
To authenticate against your local Active Directory, you do not need to make your system accessible from outside your network. We provide an authentication tool that you install on a machine in your network. Then, the tool uses functions of IIS to authenticate against your local Active Directory. The tool uses the credentials it receives to generate a JSON Web Token (JWT) signed with SHA256. This token is then securely forwarded to our service using HTTPS.
|
Note: As the described setup has to be performed by a customer administrator within the company network, we have no direct access to this configuration settings. As each network can have internal individual specifics and security settings we can not provide direct support in case of problems with the installation. The responsibility of the own network settings lies exclusively with the customer. |
Please download the authentication tool here: DOWNLOAD Authentication Tool
Please set up authentication according to the following instructions:
|
Installation authentication tool
1. Please provide a machine with IIS installed (Microsoft Internet Information Server (IIS) 7.0, 7.5, 8, 8.5 or 10) The system must be located in a domain from which the required Active Directory is accessible. In addition, the IIS must be accessible to all users who are to be authenticated. There must be no direct connection between our services and your IIS! For this reason, an internet connection is only mandatory for the IIS if the users should be able to access the IIS from the internet.
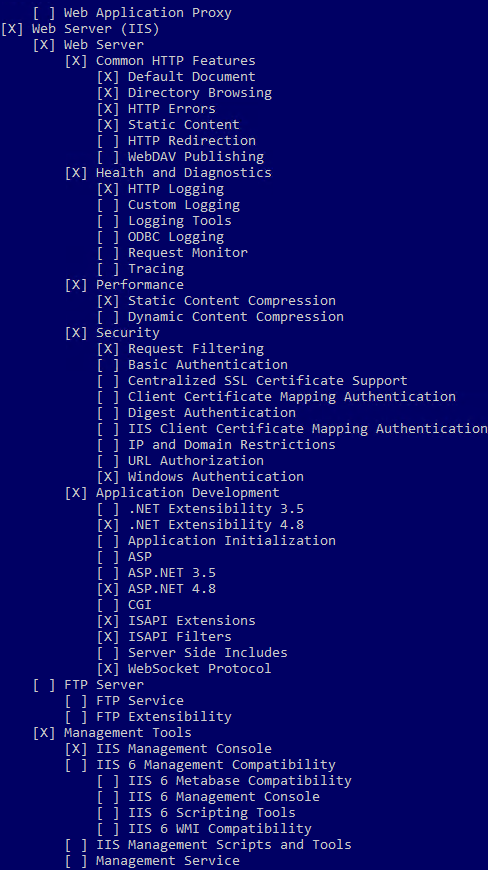
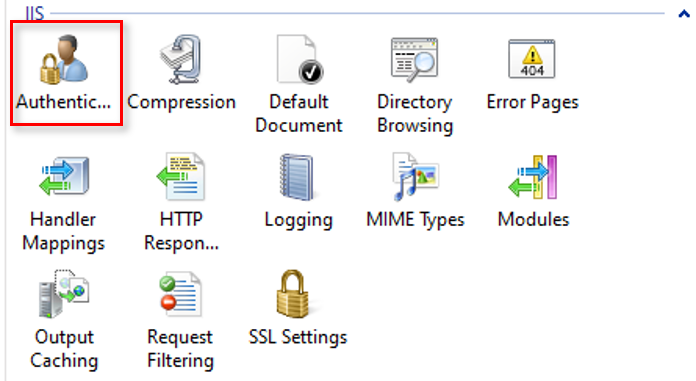
2. The following system components of IIS must be enabled as a minimum:
3. Create a subfolder (with a name that is unique to you) under the path C:\inetpub\wwwroot\, we recommend 'Authentication'. If this folder already exists, make sure it is empty. Please delete any existing data in this folder.
Extract the zip file provided in this article to C:\inetpub\wwwroot\[your subfolder name]
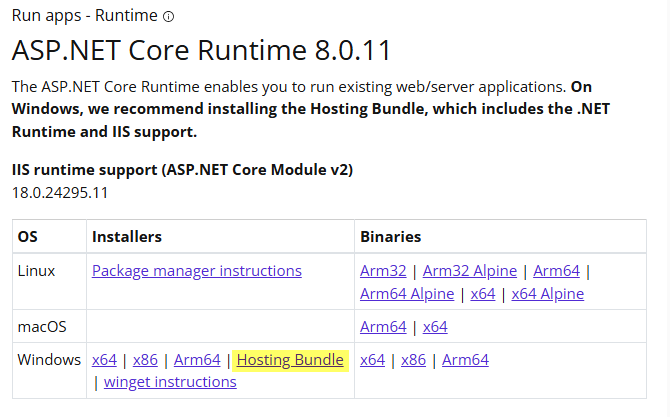
4. Please download the latest version of the 'ASP.Net Core Runtime 8.0 Bundle' and install it on the IIS. https://dotnet.microsoft.com/en-us/download/dotnet/8.0
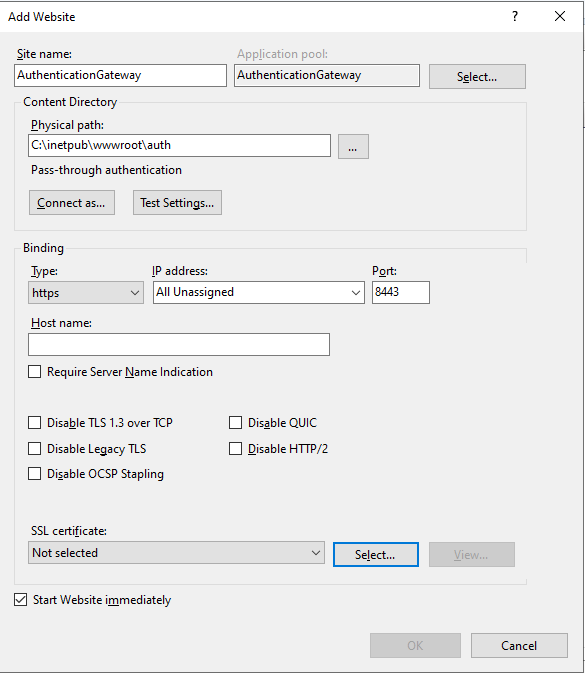
5. Right-click on the Sites folder and create a new website:
The physical path must be the appropriate subfolder from point 3, we recommend 8443 as the port - the binding must be https and an SSL certificate MUST be present. We recommend using an existing server/root certificate from your domain. Please ensure that your chosen port is not blocked by your firewall or security settings, otherwise the ticketing system will not be able to access the application.
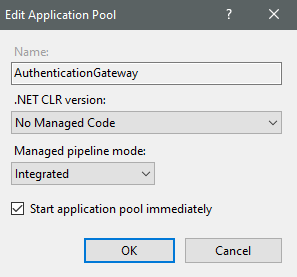
6. A new ApplicationPool has been created with the name of the site created in step 5. Right-click on it, select 'Basic Settings' and configure it as shown in the screenshot:
7.
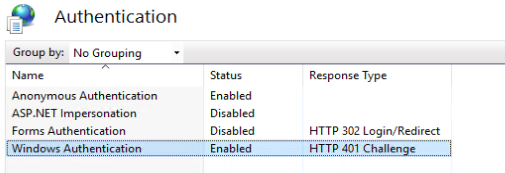
Deactivate all options, only the ‘Windows authentication’ and ‘Anonymous authentication’ options must be activated.
8. Go to the C:\inetpub\wwwroot folder and right-click to open the properties of the folder created in point 3 (in our example, 'Authentifizierung'). The users 'IUSR' and 'IIS_IUSRS' both need the following permissions:
9. The Authentication Gateway tool can now be accessed at https://localhost:8443, provided the settings have been adopted as recommended by us. If you have selected a different port, please use this one.
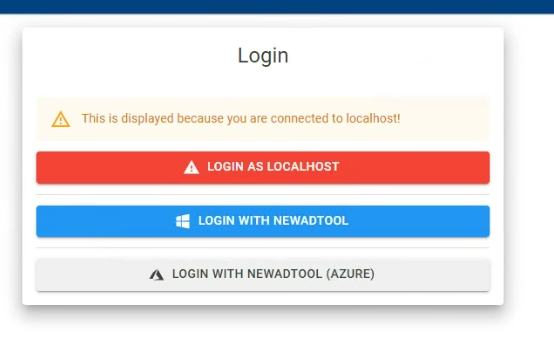
The Localhost login is only available on the same machine on which the tool is installed and is important for initial setup. (You are automatically Admin)
For all other login types an admin must be defined, see the corresponding setup steps. Otherwise you can only administer the application on the IIS server.
Windows login may be available if you have configured a login for Windows AD.
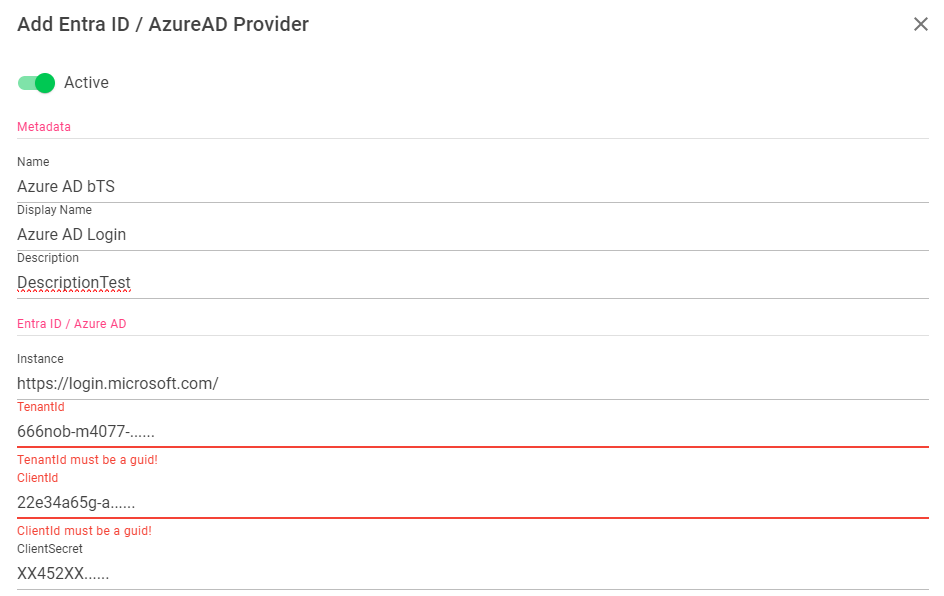
Azure AD / Entra ID Login may be available if you have configured a login for Azure AD. You can store 0-n providers here
When setting up the authentication method (display name), the button labels can be named individually.
|
Configuration in Azure
|
Configuration in Azure
These steps are only necessary if a login is to be offered via Azure. The following screenshots contain sample data and may differ from yours.
1. Creating a new app registration In Microsoft Azure, navigate to ‘Microsoft Entra ID’ and then to ‘Manage / App registrations’.
Click the ‘+ New Registration’ button there
Settings:
The app registration is created with the ‘Register’ button. Once created, navigate to ‘Manage / Certificates & secrets’ in the app registration. Create a new secret client key, the values for which can be freely selected.
Important: Remember the contents of the ‘Value’ and ‘Secret ID’ fields, as these can no longer be read after reloading the page.
These values are required later in the provider configuration.
2. Create Roles This is only necessary if you want to allow or disallow certain users from logging into the system or the Authentication Gateway admin interface.
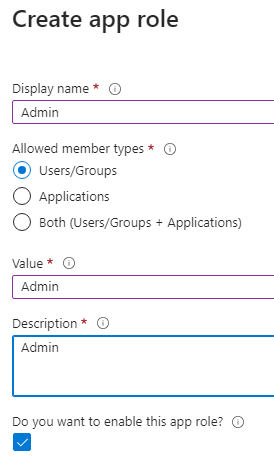
In the app registration, navigate to ‘Manage / App roles’. Any number of roles can be created. In this example, we will create the 'Admin' role to allow users to log in as Admin.
All fields can be assigned as required. The ‘Value’ field is the value that is required in the Authentication Gateway.
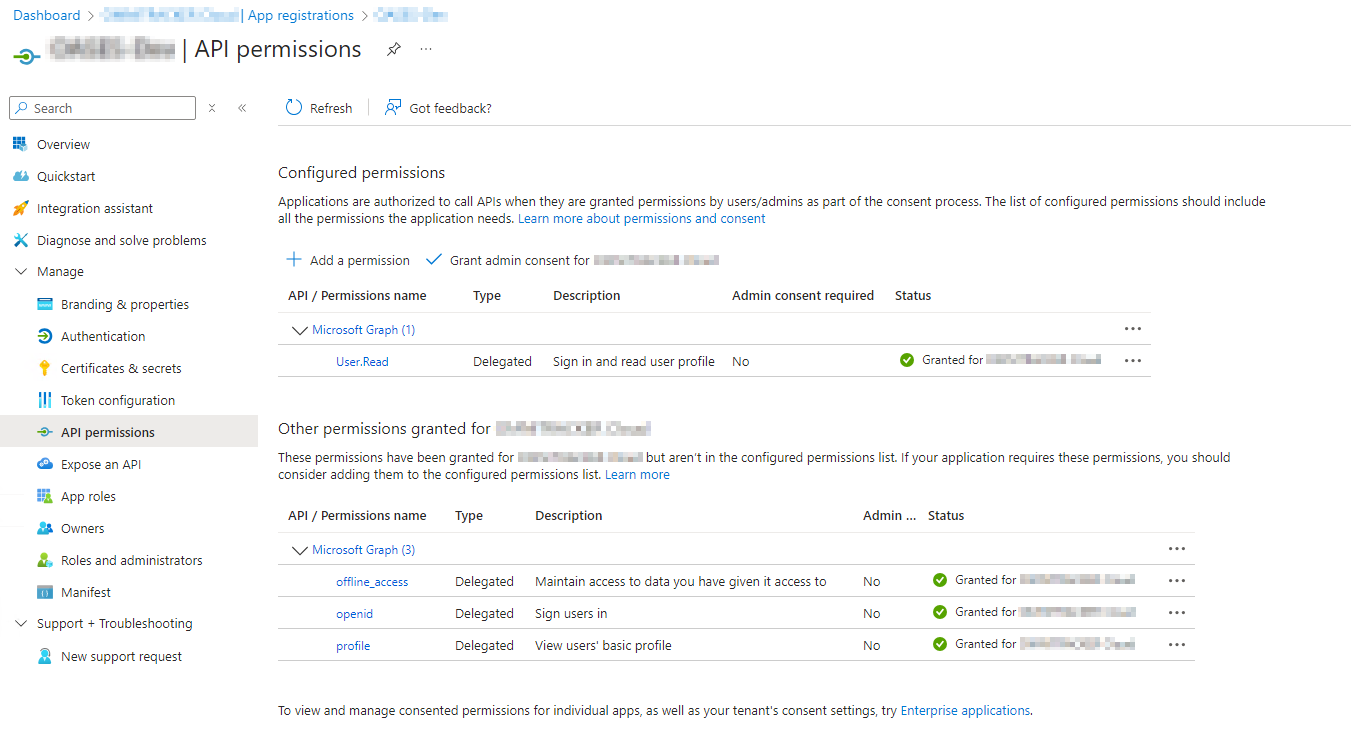
3. Check tool´s permission
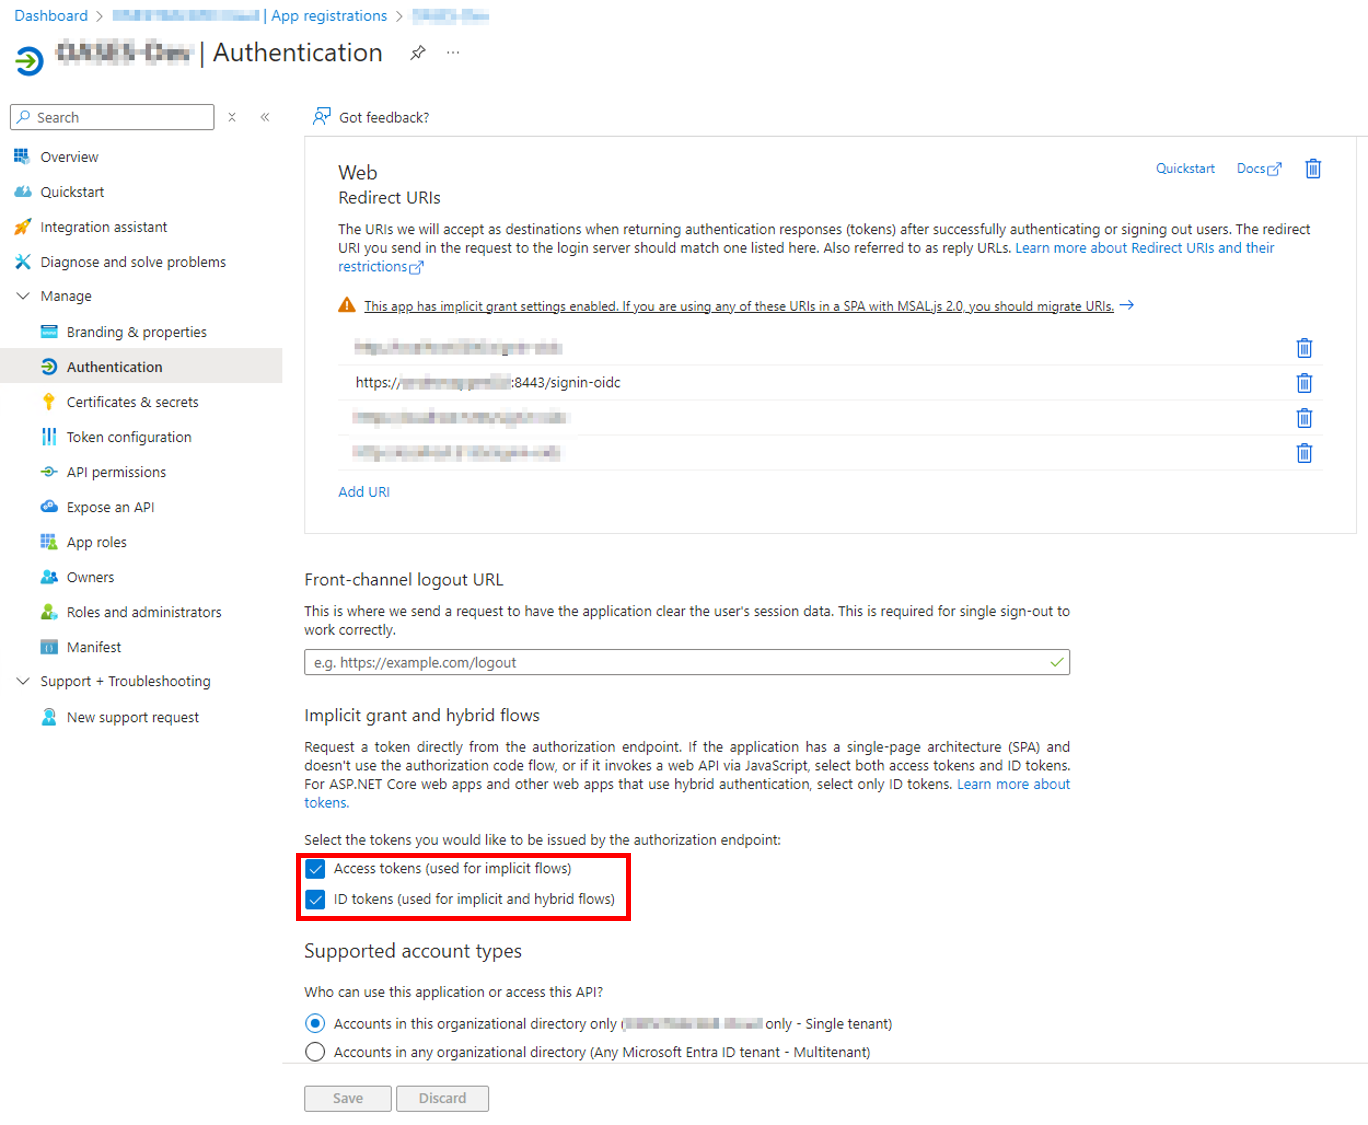
4. Set tool´s Token permissions
5. Assign Roles In the application registry, you can find the application you added under Summary, next to 'Managed application in local directory:':
Click on 'Manage / Users and Groups' and add the relevant users by clicking on '+ Add User/Group' and assign a role to them.
CAUTION: Any roles created here will only apply to this business application in Azure and not to other existing business applications.
|
Settings in the authentication tool:
|
Settings in the authentication tool:
Under Token, select the settings as shown in the screenshot and enter the key from the ticketing system. Make sure that 'Accept all' is always enabled.
To set up a Windows login, follow these steps:
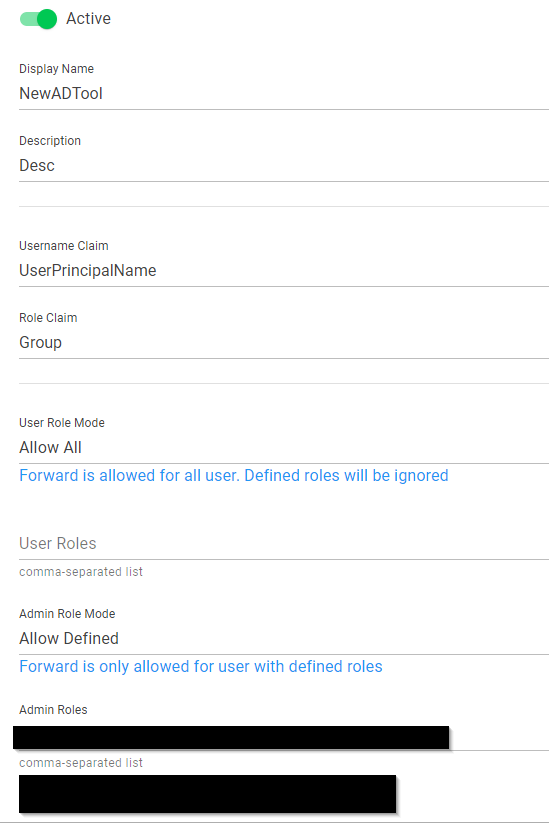
1. Configuring a provider
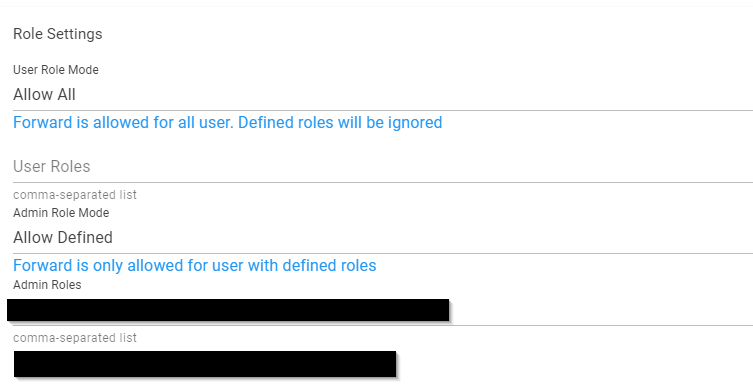
User Role Mode must be set to ‘Allow All’ so that the users are forwarded.
Unless you want to use a corresponding user concept and not all users that are created should be allowed to connect to the ticket system in this way. You can then define the corresponding user groups under User Roles.
For Admin Role Mode, we recommend a user concept where only certain groups are allowed to log in to the authentication tool as Admin. You can specify these groups in the Admin Roles.
2. Login to the TicketSystem:
Please note that with the new tool you no longer have to use /auth but :[port number (preferably 8443)].
|
Procedure for the setup within the ticketing system
After installing the local authentication tool, the following activities must be performed:
|
Set the following on the master data forms of the people and users who should be able to log in via single sign-on:
Persons, form section "login data": 1.Generally, the "Access SSP" field must first be set to "Access granted" for all persons who are to have access to the SSP. 2.For all persons for whom authentication via single sign-on is desired, additionally set the Authentication field to "Windows" and thus enter your Windows domain name as mandatory. In this way, the person is given the option of logging into the Self-Service Portal using either a user name/password OR Windows single-sign on. 3.If the Authentication field is set to "Password", the entered Windows domain will be deleted and the person will only be able to log in using the assigned username/password.
Tip: To activate the SSP login or the Windows authentication for many persons at the same time, there are corresponding buttons on the administration tile Persons/User next to the list. You can select several or all persons and then use the buttons to create the authorizations. In the upper left part of the list all persons can be marked by a check mark.
Users, form section "login data": The authentication setting for users is the same as for persons. If access to the Self-Service Portal is granted as an option, the user's user name/password for the Self-Service Portal log-in are identical. The only difference for users is that if "Windows" authentication is set, logging in for normal access using the user name/password is no longer possible! The log-in to the Self-Service Portal is still possible via both options.
|
|
Notes: The login name of the users in the Active Directory must match the user names in the master data of the users and persons so that a single-sign on logon can take place. The passwords in the ticketing system are exclusively those that are individually maintained there by the administrator or user. For security reasons, we do not automatically store e.g. the Windows password of a user here. Each customer is responsible for the individual assignment and any necessary security features of the passwords. |
