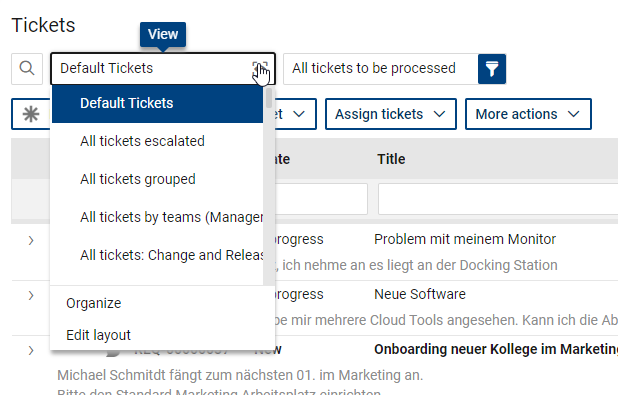
The current view is displayed in the action menu and can be changed via a drop-down menu if several views are available for selection in the current area. The titles of the views are usually self-explanatory. You can switch between the available views at any time. In some areas, special views or filters may also be displayed as a separate button in the action menu.
The following display options are available:
•List: Displays the objects (tickets, tasks, assets, etc.) in a list with corresponding columns.
•Tree: Enables the direct unfolding of individual objects in a list and the display of relationships without having to open an object (e.g. child and parent tickets).

•Grouped: In this view, a column has been defined directly as a grouping column, i.e. you initially get a grouped view; the number of underlying objects is in brackets. Clicking on the grouping node (arrow symbol) displays the underlying object list. You can open several groupings in parallel.
•Preview line: Individual contents from the object (usually a description text) can be displayed as a preview line. This gives the user a direct view of the respective content text without having to open the object.
•Symbols & color representations: Lines within lists can be displayed with symbols or stored colors/text highlights. These have different meanings in the respective context. Example: Each ticket type has its own icon. The icon changes when a new unread message is received in the ticket. The line turns yellow or red when a stored SLA is about to exceed the target time or the target time has already been exceeded.
•Calendar view: For some areas, a special calendar view is prepared. Here, the objects concerned are displayed in a calendar similar to Outlook in order to get a temporal overview to entries. Calendars can refer to single points in time (due date calendar, the calendar entry is automatically displayed like a "half hour block") or to a from/to point in time (planning calendar, the calendar entry is displayed with a start and end time similar to Outlook). These planning dates can usually be adjusted by dragging and dropping in the calendar, provided that the current user has the authorization. A double click opens the respective object. In the calendar displayed next to it, the days with entries are shown in bold. Below, a list shows all entries at the currently displayed period.
•Timeline view: For some areas, e.g. for transparent planning over a longer period of time, a timeline view is available. This consists of a resource (e.g. asset or employee) and a time axis for the representation of the respective object as a time bar with a start and end time (e.g. implementation period of a ticket or task). A double click on the time bar opens the object. The time bars can be moved via drag & drop or the time periods can be adjusted, provided that the current user is authorized to do so. Furthermore, a new object can be entered directly by dragging a new time period into a row. The corresponding fields (period from / to) as well as the respective resource (e.g. the asset concerned) are automatically pre-filled in the object. At the bottom of the view, if necessary, time bars are displayed that are not yet assigned to a resource. This assignment can also be made by drag & drop into the respective line. A zoom function allows to change the displayed time period. Furthermore, it is possible to jump to a specific date or to hide resources without a time bar.
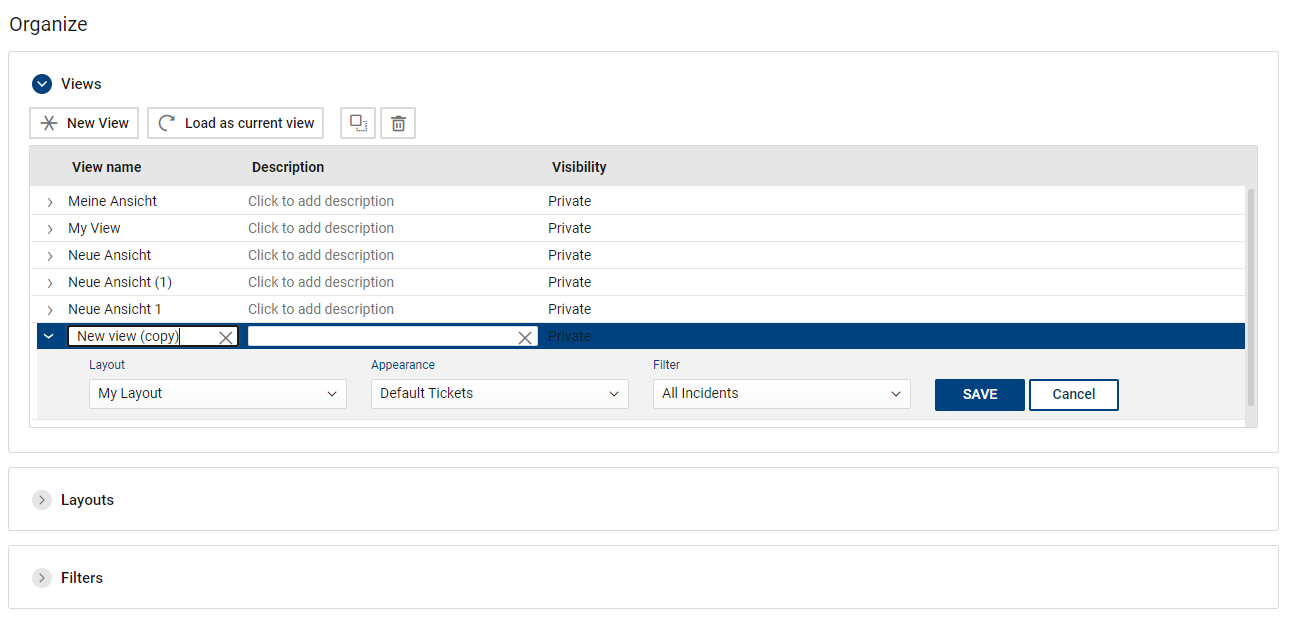
Save individual views personally
Just like filters, individual views can also be created and personally saved in order to reuse them at another time.
For this purpose, there is the menu "View" in the area Ticketing, Tasks and Asset Management/Asset DB in the views menu the options "Organize" and "Layout"
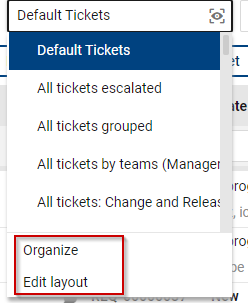
In this menu, you can quickly switch between view types as well as call editors where you can edit and save individual views.
•List view: The list view is a simple list of entries. You can display the list sorted by column.
•Tree view: This view extends the list view by an expandable tree in which - depending on the setting - several dependent objects are displayed. For tickets, these are, for example, the lists of tasks, affected assets/CIs, and parent or child tickets to the current ticket.
•Calendar view and Timeline view: These view types are only used predefined in certain places and cannot be customized. For this purpose, please select the prepared and appropriately named views from the list of views
| Column layout: Opens an editor to customize list or tree views. |
|
Recommended procedure for creating a new view: 1. select an existing view that is most similar to your desired view to save time. 2. Now open the editor "Edit layout" via the view menu. Depending on whether the basis was a tree view or a list view, the corresponding editor is displayed. From a tree editor, you can switch directly to the column editor via the "Edit column layout" button. 3. edit the tree (show reference information) or the lists (show/move columns/change sorting etc.) according to your requirements and save the layout in the initial dialog under an individual name (button "Save as") 4. Exit this editor with OK and then go to "Organize" in the Views menu. Create a new view with the "New View" button and select the desired layout plus an existing or individually created filter for the view. You cannot currently change the "Appearance" (colors and icons); use the "Default Tickets" view for this. Optionally, you can give your view a description for its purpose. You can change the name for your view by double-clicking on the line. 5. you can use the saved view for yourself in the view selection from now on |